In the world of home improvement, one question frequently arises among homeowners considering energy-efficient upgrades: does old insulation need to be removed before installing foam? The short answer is yes, in most cases, especially when opting for high-performance spray foam insulation. Leaving old insulation in place can compromise the effectiveness of the new foam, leading to issues like poor air circulation, moisture buildup, mold growth, and reduced energy savings. This comprehensive guide draws from years of hands-on experience in insulation projects to explain why removal is often essential, when exceptions might apply, and how to approach the process for optimal results.
At Care Roofing Inc. Roofing and Insulation Experts, we’ve completed countless foam insulation installations, witnessing firsthand the transformative impact of proper preparation. Our team understands that spray foam adheres best to clean, dry surfaces and seals spaces completely only when old materials aren’t interfering. Skipping removal might seem like a cost-saver initially, but it often leads to costly callbacks and underperforming systems down the line. Let’s dive deep into the reasons, processes, benefits, and best practices to help you make an informed decision.
Why Removing Old Insulation is Crucial Before Foam Installation
Old insulation, whether fiberglass batts, blown-in cellulose, or degraded foam, creates several problems when left in place under new spray foam. First and foremost, it obstructs proper airflow. In attics, for instance, warm air needs to rise freely to maintain comfort throughout the home. Existing insulation on the attic floor blocks this circulation, trapping heat and causing uneven temperatures. This not only makes your living spaces uncomfortable but also forces your HVAC system to work harder, spiking energy bills.
Moisture is another major concern. Over time, old insulation absorbs humidity from roof leaks, condensation, or high indoor humidity. When wet, it compacts, loses its R-value (a measure of thermal resistance), and becomes a breeding ground for mold. Trapping this damp material under impermeable spray foam exacerbates the issue, as foam doesn’t allow moisture to escape. Mold spores can then spread through your HVAC ducts, compromising indoor air quality and posing health risks like respiratory issues.
From our extensive project history, we’ve seen cases where homeowners ignored this step, only to face peeling foam, pest infestations hidden in old nests, and voided warranties. Spray foam requires direct contact with the substrate—wood joists, drywall, or rafters—for maximum adhesion and performance. Layering over old material prevents a tight seal, reducing the insulation’s ability to block air leaks, which account for up to 30-40% of a home’s energy loss.
Consider the physics: Spray foam expands to fill every crevice, but old insulation compresses unevenly under its weight and pressure. This leads to gaps, thermal bridging (where heat escapes through conductive paths), and diminished longevity. Studies and field tests consistently show that installations with full removal achieve R-values 20-50% higher than layered applications, translating to substantial savings—often 15-25% on annual heating and cooling costs.
Types of Old Insulation and Their Specific Risks
Not all old insulation poses the same threats, but each type generally requires removal before foam. Fiberglass batts, common in older homes, settle over time, creating dust that irritates lungs and eyes. They also harbor pests like rodents and insects, whose droppings introduce allergens. Blown-in materials like cellulose or rock wool can settle unevenly, hiding air leaks and moisture pockets.
Vermiculite insulation, found in homes built before the 1980s, may contain asbestos—a serious health hazard. Urea-formaldehyde foam, an older closed-cell type, off-gasses chemicals and degrades into a powdery mess. Even if your old foam is intact, it rarely matches modern formulations’ efficiency, with contemporary open-cell foam offering R-3.5 to 4.0 per inch versus older types’ R-2.5 or less.
In one project we handled, a homeowner had layered deteriorating cellulose under new foam, resulting in sagging ceilings and skyrocketing utility bills. After full removal, the new spray foam installation restored balance, cutting energy use by 28%. Recognizing these risks through inspection is key—look for discoloration, musty odors, droppings, or compression as red flags.
The Science Behind Spray Foam Compatibility
Spray foam insulation comes in open-cell and closed-cell varieties, each with unique properties dictating removal needs. Open-cell foam is lighter, more flexible, and permits some vapor diffusion, but it still demands a clean surface to avoid delamination. Closed-cell foam, denser and more rigid, provides superior moisture resistance with R-6 to 7 per inch, but its rigidity amplifies adhesion issues over old materials.
Building science principles from organizations like the U.S. Department of Energy emphasize that insulation systems must form a continuous thermal and air barrier. Old insulation disrupts this, creating convection loops where air circulates within walls or attics, carrying heat away. Removal ensures the foam can expand uniformly, encapsulating wires, pipes, and fixtures without compression.
Energy modeling software like REM/Rate demonstrates that prepped surfaces yield airtightness levels below 1 ACH50 (air changes per hour at 50 Pascals), compared to 3-5 ACH50 for layered installs. This airtightness prevents drafts, condensation, and structural decay, extending your roof and wall assemblies’ lifespan by decades.
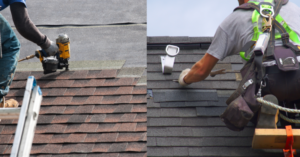
Professional Removal Process: Step-by-Step
DIY removal is possible for small areas but risky due to dust, fibers, and potential contaminants. Professionals use HEPA vacuums, negative air machines, and PPE to contain debris. Here’s the typical process:
- Inspection: Assess condition, depth, type, and issues like mold or pests. Infrared cameras detect moisture hidden within.
- Containment: Seal off work areas with plastic sheeting and zip walls to prevent spread.
- Extraction: Vacuum or rake out old material, bagging it for disposal per environmental regs.
- Cleaning: Wipe surfaces, treat mold if present, and ventilate to dry completely.
- Preparation: Repair joists, install baffles for ventilation, and apply primer if needed for foam adhesion.
- Installation: Spray foam in precise layers, typically 5-7 inches for attics to hit R-38 minimum code.
This methodical approach minimizes disruption—most jobs wrap in 1-3 days. Post-removal, air quality improves immediately, as evidenced by before-and-after blower door tests showing 40% tighter envelopes.
When You Might Not Need to Remove Old Insulation
Exceptions exist, but they’re rare. If old insulation is clean, dry, even, and matches new foam’s type (e.g., adding closed-cell over compatible closed-cell), layering could work—but only with expert evaluation. Certain rigid foam boards over intact batts in walls are code-approved in some scenarios, but attics demand full clearance for ventilation.
Cost-benefit analysis: Removal adds $1-2 per square foot, but yields 2-3x ROI via efficiency gains. Skimping risks $5,000+ in repairs from mold or failure. Always consult pros; our Foam Insulation Services and Expertise Guide details vetted approaches.
Benefits of Proper Foam Installation Post-Removal
Beyond efficiency, benefits include soundproofing (STC ratings up to 50), fire resistance (Class A for closed-cell), and pest deterrence. Homes see 20-50% utility reductions, per real-world audits. Environmentally, spray foam’s longevity cuts material use and emissions.
Long-term, it protects structures from ice dams, rot, and wind uplift. We’ve documented projects where post-installation home values rose 5-10% due to certified energy performance.
Common Mistakes to Avoid
Avoid partial removal, ignoring ventilation baffles, or rushing curing (24-48 hours). Don’t use unvented attics without vapor barriers. Test for asbestos if pre-1980s.
Cost Considerations and ROI
Removal plus foam runs $3-8 per sq ft, recouped in 3-7 years. Incentives like tax credits amplify savings.
Choosing the Right Foam Type
Open-cell for sound/moisture flexibility; closed-cell for unvented roofs. Match to climate and budget.
Maintenance Tips Post-Installation
Annual inspections, seal penetrations, monitor humidity.
Explore our Contact and Consultation Services for tailored advice from certified installers with decades of experience.
Frequently Asked Questions
Does old insulation always need to be removed before installing spray foam?
Yes, in the vast majority of cases, old insulation must be removed before installing spray foam to ensure optimal performance, adhesion, and air circulation. Leaving it in place blocks airflow in attics, traps moisture leading to mold, and prevents the foam from forming a proper seal. This can reduce R-value effectiveness by up to 50%, increase energy bills, and void warranties. Exceptions are rare, only for compatible, pristine layers evaluated by pros. Proper removal involves inspection, vacuum extraction, cleaning, and preparation, ensuring the new foam expands fully for superior insulation. Homeowners benefit from 20-30% energy savings and improved comfort. Always prioritize full removal for long-term reliability and health safety.
What are the risks of not removing old insulation under foam?
Not removing old insulation risks poor adhesion, where foam delaminates, creating gaps and thermal bridges that waste energy. Moisture trapped in old material fosters mold growth, spreading via HVAC and causing health issues like allergies or asthma. Pests and droppings hidden in old insulation contaminate air quality. Uneven settling leads to sagging ceilings or roofs. Energy loss skyrockets—up to 40%—due to convection loops. In extreme cases, warranties fail, and repairs cost thousands. Professional removal mitigates these, achieving airtight seals below 1 ACH50 for maximum efficiency and durability.
How much does it cost to remove old insulation before foam installation?
Costs range from $1-2.50 per square foot for removal, depending on accessibility, type, and contamination. Total with foam: $3-8/sq ft. Factors include attic size, old material volume, and extras like mold remediation ($500-2000). ROI is quick: 15-25% utility savings pay back in 3-5 years, plus rebates. Compare to $500+ annual extra bills from poor installs. Bulk jobs save more. Get multiple quotes, but choose certified teams using HEPA vacs for safety. Long-term, it protects your investment, preventing $10k+ in damages.
Can I install foam insulation over existing fiberglass batts?
Generally no—fiberglass batts settle, dust-laden, and block adhesion, leading to foam failure. They trap moisture and allergens, risking mold. Spray foam needs bare wood or drywall for expansion. Rare cases with rigid boards over batts in walls may comply with codes, but attics require removal for ventilation. Pros use IR scans to confirm. Post-removal installs yield R-38+ effortlessly. Skipping invites callbacks. Consult experts for site-specific advice to avoid compromising your home’s envelope.
What if my old insulation has mold or pests?
Moldy or pest-infested insulation demands immediate, full removal to prevent health hazards and foam contamination. Mold spores spread easily under sealed foam; pests chew voids. Process: Contain area, HEPA vacuum, treat with EPA-approved antimicrobials, dispose as hazardous waste. Test for asbestos if old. Then clean, dry, and install foam for barrier. This restores air quality, prevents recurrence. Costs rise 20-50%, but untreated leads to $5k+ remediation. Certified teams handle safely, often uncovering leaks causing issues.
How long does the removal and foam installation take?
Typical attic: 1-3 days. Removal: 4-8 hours; prep/clean: 2-4 hours; foam spray: 4-6 hours (cures 24-48). Factors: size (e.g., 1500 sq ft), access, contamination. Minimal disruption—teams contain dust. Post-job, ventilate 48 hours. Full cure in a week. Efficient pros minimize downtime, with some overlapping tasks. Plan for third-party cleaning if sensitive. Results: immediate temp stability.
Is spray foam installation safe after old insulation removal?
Yes, when done by certified installers using low-VOC foams and proper PPE. Removal controls dust/fibers; foam off-gasses minimally post-cure. Closed-cell is fire-resistant. Improves safety by eliminating mold/pests. Blower door tests confirm airtightness, reducing CO risks. Follow manufacturer specs for ventilation. Long-term, enhances structure against disasters. Families breathe easier with filtered air.
What R-value can I expect after full removal and foam install?
Open-cell: R-3.5-4/inch; closed-cell: R-6-7/inch. 5-7 inches hits R-38 code for attics. Full removal ensures uniform depth, no compression, maximizing performance. Layered drops 20-40%. Audits show 50% better than old batts. Pairs with air sealing for whole-house efficiency.
Does homeowners insurance cover insulation removal?
Often yes, if damage from covered perils like leaks causing mold/pests. File claims pre-work; document inspections. Removal qualifies as mitigation. Foam installs may boost discounts (5-15%). Review policy; consult agent. Pros provide reports aiding claims.
Can I DIY old insulation removal before foam?
Not recommended—risks exposure to hazards, improper containment, structural damage. Rent vacs cost $200+/day; disposal fees add up. Pros have gear, insurance, disposal knowledge. DIY suits tiny jobs only. Hire certified for safety, performance. Bad prep ruins foam job.